
Rising and shaping bread
 One you're done kneading your
dough, return the dough to the bowl
and
cover it with a damp dish towel to rise. In a modern home, you
can just let the bread sit on the counter, but if you're a more serious
homesteader who heats with wood and doesn't maintain an even
temperature inside during the winter, you'll want to find a warm spot
for your dough to rise. Many wood cook stoves have a warming oven
just high enough above the fire to keep the dough warm without cooking
it. In a pinch, you can turn your electric or gas oven to "warm"
and put your bread inside --- depending on the model, you may also need
to crack the door open to keep the dough from getting too hot. No
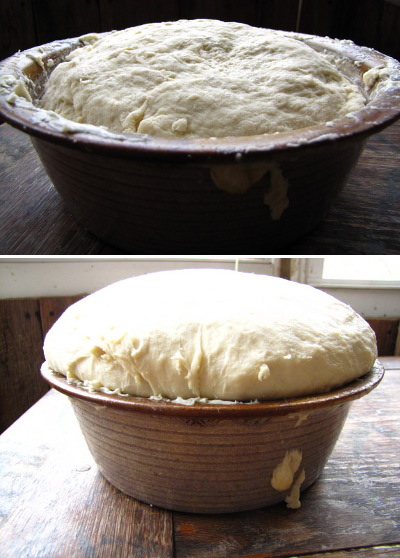
matter how you do it, your bread should have risen to the point where
it has achieved twice its original size ("doubled in bulk") after about
an hour.
One you're done kneading your
dough, return the dough to the bowl
and
cover it with a damp dish towel to rise. In a modern home, you
can just let the bread sit on the counter, but if you're a more serious
homesteader who heats with wood and doesn't maintain an even
temperature inside during the winter, you'll want to find a warm spot
for your dough to rise. Many wood cook stoves have a warming oven
just high enough above the fire to keep the dough warm without cooking
it. In a pinch, you can turn your electric or gas oven to "warm"
and put your bread inside --- depending on the model, you may also need
to crack the door open to keep the dough from getting too hot. No
matter how you do it, your bread should have risen to the point where
it has achieved twice its original size ("doubled in bulk") after about
an hour.
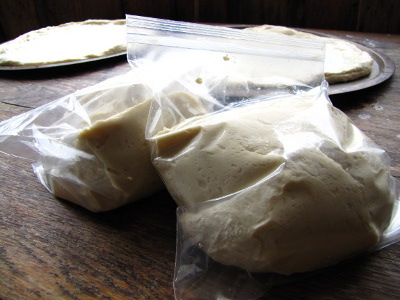 After it has risen, punch down your dough, shape it, and let it rise
again. If you want to save some of the dough for later, put it in
a plastic bag after the first rise and stick it in the freezer.
Otherwise, shape the dough however you want --- into rolls, buns, or
loaves. You can even form long strands of dough to make braided
loaves, or can add cheese or herbs to make spiced buns.
After it has risen, punch down your dough, shape it, and let it rise
again. If you want to save some of the dough for later, put it in
a plastic bag after the first rise and stick it in the freezer.
Otherwise, shape the dough however you want --- into rolls, buns, or
loaves. You can even form long strands of dough to make braided
loaves, or can add cheese or herbs to make spiced buns.
If you're a raw
beginner, I recommend keeping it simple and making
buns. It can be difficult to know when your bread is fully baked
in a loaf pan, but dough in the shape of a hamburger bun cooks
perfectly in very little time. Simple tear off a hunk of dough
about half the size of your fist and flatten it, placing each bun on a
greased cookie sheet. If you want to get fancy, you can sprinkle
poppy or sesame seeds on top, then paint on an egg yolk to make the
seeds stick and to give the bread a beautiful shine.
 Now it's time to let the
dough rise until it doubles in bulk
again. Pay more attention this time to ensure you don't ignore
the
dough too long and let it over-rise --- after a certain point, the
gluten can't hold the carbon dioxide any longer and your buns will
flatten out. But don't try to rush this rise either --- you want
your dough to be as high as possible so you get fluffy bread.
Now it's time to let the
dough rise until it doubles in bulk
again. Pay more attention this time to ensure you don't ignore
the
dough too long and let it over-rise --- after a certain point, the
gluten can't hold the carbon dioxide any longer and your buns will
flatten out. But don't try to rush this rise either --- you want
your dough to be as high as possible so you get fluffy bread.
Preheat your oven to 350
degrees Fahrenheit, then bake your bread on
the top rack until the top and bottom of each bun is very lightly
brown, about fifteen minutes. Don't worry, the living yeast will
be killed by heat, so all you're left with is a delightful texture and
flavor.
Stay
tuned for more on the science and practice of
bread-baking at lunchtime for the rest of the week. Don't want to
wait for future installments? The
information is excerpted from Weekend
Homesteader: January, which is available for free on
Amazon from today until December 23! I hope you'll give the
entire book a try (and leave me a review!)
| This post is part of our Bread lunchtime series.
Read all of the entries: |

Or explore more posts by date or by subject.
About us: Anna Hess and Mark Hamilton spent over a decade living self-sufficiently in the mountains of Virginia before moving north to start over from scratch in the foothills of Ohio. They've experimented with permaculture, no-till gardening, trailersteading, home-based microbusinesses and much more, writing about their adventures in both blogs and books.
Want to be notified when new comments are posted on this page? Click on the RSS button after you add a comment to subscribe to the comment feed, or simply check the box beside "email replies to me" while writing your comment.
Hi, I just wanted to say that I just stumbled upon your site and really enjoy it. I'll add a link to your site on mine (under Living Simply) in the next day or so. I also have a lot of info on baking bread from scratch that you may be interested in. Anyhow, just wanted to say hi. Peace, Joe
www.urbansimplicity.com