
A second chance at floor building
 Halfway
through our homemade
storage building project, we opted to make a few changes. It
was originally envisioned as a workshop where Mark could build our chicken waterers, but once we decided to put
the exterior wood stove
inside, it made sense to repurpose it as Mark's bedroom/office
instead. In its new incarnation, though, the bed would have been
too close to the stove, and Mark wanted to raise his mattress up a bit,
so we decided to add another four feet to the length of the
structure.
Halfway
through our homemade
storage building project, we opted to make a few changes. It
was originally envisioned as a workshop where Mark could build our chicken waterers, but once we decided to put
the exterior wood stove
inside, it made sense to repurpose it as Mark's bedroom/office
instead. In its new incarnation, though, the bed would have been
too close to the stove, and Mark wanted to raise his mattress up a bit,
so we decided to add another four feet to the length of the
structure.
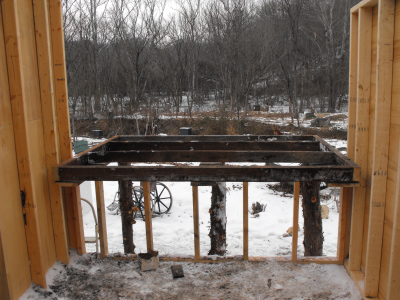 Tuesday,
we installed the floor for the bed addition, which felt a bit like
doing homework math problems --- you get a chance to correct the
misunderstandings you made the first time around and to cement the
proper method into your motor memory. This time, I
took Shannon's advice and put the rim joists on right away, which had the added benefit
of meaning that we didn't need to use expensive brackets.
Tuesday,
we installed the floor for the bed addition, which felt a bit like
doing homework math problems --- you get a chance to correct the
misunderstandings you made the first time around and to cement the
proper method into your motor memory. This time, I
took Shannon's advice and put the rim joists on right away, which had the added benefit
of meaning that we didn't need to use expensive brackets.
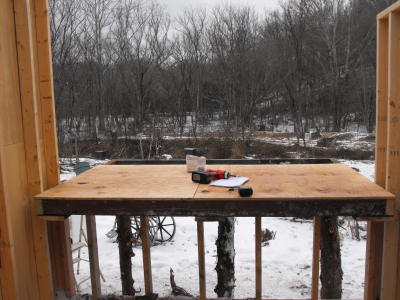 We
used salvaged three by fours for the floor joists. The sawmill
lumber wasn't exactly straight, but I suspect it'll be just as strong
as store bought two by sixes. After all, the three by fours
really are three inches by four inches, so they have nearly half again
as much cross-sectional area as the two by sixes.
We
used salvaged three by fours for the floor joists. The sawmill
lumber wasn't exactly straight, but I suspect it'll be just as strong
as store bought two by sixes. After all, the three by fours
really are three inches by four inches, so they have nearly half again
as much cross-sectional area as the two by sixes.
| This post is part of our Building a Storage Building from Scratch
series.
Read all of the entries: Part 1: Foundation
Part 3: Walls and scavenging lumber
Part 5: The roof
|

Or explore more posts by date or by subject.
About us: Anna Hess and Mark Hamilton spent over a decade living self-sufficiently in the mountains of Virginia before moving north to start over from scratch in the foothills of Ohio. They've experimented with permaculture, no-till gardening, trailersteading, home-based microbusinesses and much more, writing about their adventures in both blogs and books.
Want to be notified when new comments are posted on this page? Click on the RSS button after you add a comment to subscribe to the comment feed, or simply check the box beside "email replies to me" while writing your comment.
I peeked at a couple comments and Photos on you building and I have to say I'm not liking what I'm seeing. My hat is off to both of you for doing the work your-selves but some of the things you have done will not hold up in the long run.
Your cedar logs for columns appear to be sitting on the ground, but yet I see concrete blocks in the same pic...having the logs sitting on the blocks will help tremendously. Cedar is resistant to decay but not nearly as much as Pressure treated and end grain is even more vulnerable. There are tons of brackets designed to keep the bottom of posts out of the dirt or off the concrete. The Simpson website can show you the 100's of things that they have. Here is a typical post anchor I use for decks.
http://www.strongtie.com/products/connectors/AB-ABA-ABE-ABU.asp
I am a ICC (International Code Council) certified residential class C contractor...I do remodels and Additions, In addition to tile and hardwood flooring, custom furniture. In the last few years I have seen many projects like yours that were paying the price of "Wood + Dirt or Moisture = Rot" The simplest and cheapest foundation are cement pier blocks...these set up off the ground and can accommodate dimensional lumber. They are typically used for sheds and decks.
http://www.deckplans.com/
The next level of "robustness" is a poured Tube foundation.
http://www.finehomebuilding.com/PDF/Free/021180044.pdf
The next level up from there is a full length concrete foundation. Your "mudsill" would typically be placed on a full length foundation. A 2x board should never be used on the flat unless it is supported its full length. For my cabin I poured small 16" x 16"x 12" deep footers that have a 6x6 pressure treated post above. Spanning all of the posts are 3 2x8 lagged and mailed together to make a sturdy beam...the floor joists then set on the beam. Rim joists are the boards that run around the perimeter. These are required because the majority of the load (from the walls) is applied to the edges of the "deck". It is not uncommon to have double rims to take the load for larger structures. Another reason for using a poured "footer" to to gain some protection from "uplift" wind can and often does blow under structures that are not set on a standard foundation. The weight of the concrete and the lift resistance of the friction between it and the soil provide uplift protection..that said, all of the additional members need to be tied together...sill "j- bolt" embedded in the concrete, post bolted to j-bolt with lags / or bolts, beam anchored to post with metal ties..etc.
You can see some pics of my beam / footer foundation at the small cabin forum I post to. Second entry on page 2.
http://www.small-cabin.com/forum/6_169_1.html
By comparison an addition that I did on my own home a few years back, has a number of piers...the two that support the east end are dug to 5 feet deep (our frost depth here in the mountains at 8500ft) with a 3' x 3' base, rising up from this is a 16" diameter tube, with four "L" shaped sections of 1/2" rebar held together with a few circles of rebar. On top of these concrete piers are two 4" Schedule 40 steel tubes (7 + 15 feet high) that support a 30 foot 16x77 (16" tall I-beam, 77pounds per foot)...this is the span that the structural engineer came up with to make the span over our leach field....the beam weighed in at 2300 pounds and I had to hire a crane to get it set.
I looks like you have some room under there to add a built up beam, it sucks having to dig proper footers under a house (I have done a few of these) but it is one way to keep your posts from rotting away. (I have replace a couple of fences in the last year..even here in our very dry climate these cedar post bases were completely rotted away after 10 years or so. It would be a bummer to build the top of your building to last 50 years or more only to have the base rot away after just a few...
I had not noticed any headers over the windows and doors for roof support in the other pictures. Here is a helpful link.
http://www.renoyourlife.com/heading-in-a-new-direction
Best of luck with your new building.