
Installing a package into a Warre hive
 If you understand the basics
of bee package installation, putting a package into a Warre hive is absurdly simple.
You'll want to start with two boxes, with top bars in place in the
bottom box and absent in the top box. Set aside the cover and
quilt for now and get your package ready.
If you understand the basics
of bee package installation, putting a package into a Warre hive is absurdly simple.
You'll want to start with two boxes, with top bars in place in the
bottom box and absent in the top box. Set aside the cover and
quilt for now and get your package ready.
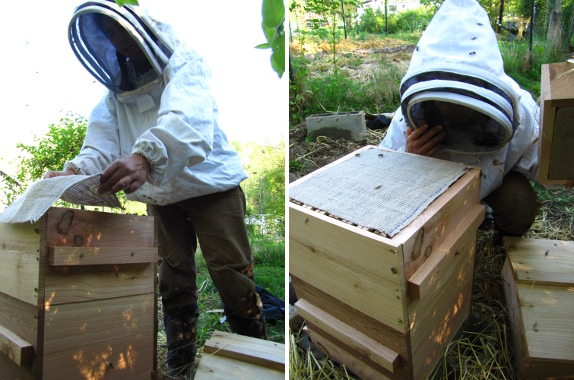
After prepping your
queen cage, simply lay it flat on the top bars of the bottom box.
You don't want to set the queen cage on the bottom of the entire hive
because she'll need bees to cluster around her for warmth during the
first couple of nights before she chews her way free, and the bees will
prefer to hang out above the ground.
Now pour the worker bees
into the empty top box. This procedure becomes much more complex
if you made your Warre hive
in the traditional manner, with fixed frames. In that case, you
either
have to pour bees into an inverted top box and flip it into place, or
run
the bees up a  white sheet or towel into the
box. Luckily, Mark
installed pins in my Warre hive so I can move the frames as
needed.
I'll still keep my hands off as much as possible to maintain
the integrity of the hive.
white sheet or towel into the
box. Luckily, Mark
installed pins in my Warre hive so I can move the frames as
needed.
I'll still keep my hands off as much as possible to maintain
the integrity of the hive.
With the queen and
workers in place, you can replace the bars in the upper box. This
would be a good time to have a bee brush on hand, but it also works to
just lower top bars slowly enough that bees can escape out from under
them.
Blowing is another
method of getting bees out of your way as you place the burlap inner
cover, then the quilt
box on top of the hive.

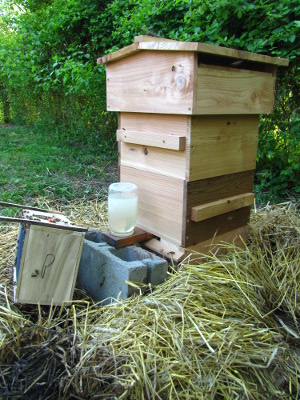 We filled our quilt box with
straw, but you can use any insulative material. (It's best to do
that before the bees are buzzing around your head.) The roof
slides right down over top of the quilt, sealing the insulative
material in with an inner mouse board, but allowing air to flow under
the eaves.
We filled our quilt box with
straw, but you can use any insulative material. (It's best to do
that before the bees are buzzing around your head.) The roof
slides right down over top of the quilt, sealing the insulative
material in with an inner mouse board, but allowing air to flow under
the eaves.
The entrance feeder for
my Langstroth hive fit into the mouth of the Warre hive once I put a
cinderblock underneath to support it. This narrows the entrance
quite a bit, so I'll probably find another place for the feeder once
the bees are really up and running, but it'll be good enough for now.
 Stay tuned for tomorrow's
post, which covers removing the queen cage and making sure the first
combs are being built straight.
Stay tuned for tomorrow's
post, which covers removing the queen cage and making sure the first
combs are being built straight.
Meanwhile,
don't forget to preorder
a copy of my paperback, chock full of projects to make your
homesteading adventure a success.
| This post is part of our Bee Package lunchtime series.
Read all of the entries: |

Or explore more posts by date or by subject.
About us: Anna Hess and Mark Hamilton spent over a decade living self-sufficiently in the mountains of Virginia before moving north to start over from scratch in the foothills of Ohio. They've experimented with permaculture, no-till gardening, trailersteading, home-based microbusinesses and much more, writing about their adventures in both blogs and books.
Want to be notified when new comments are posted on this page? Click on the RSS button after you add a comment to subscribe to the comment feed, or simply check the box beside "email replies to me" while writing your comment.