
How to make a large worm bin
 There's so much I want to
tell
you about our new worm project that I decided it needed to be a
lunchtime series. I'll start out with the design of our large-scale
worm bin.
There's so much I want to
tell
you about our new worm project that I decided it needed to be a
lunchtime series. I'll start out with the design of our large-scale
worm bin.
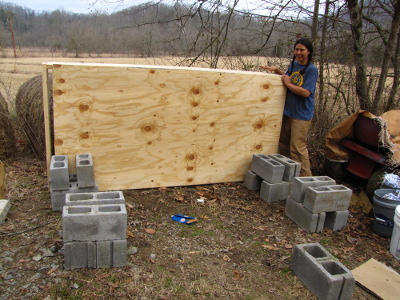
As you can see from this
first photo (upside down during construction),
the bin is pretty simple. Our supply list included:
- 3 @ 4'X8' sheets of plywood (for lid and two bottoms)
- 3 @ 2"X3"X8' (for spacer between bottoms)
- 3 @ 2"X12"X8' (for walls)
- 3 hinges for the lid
- 2 clasps to hold the lid shut
- screws
- 16 cinderblocks (or some treated 4"X4"s) for legs
 We cut one of the 2X12s and
one
of the 2X3s in half (and if we'd been thinking straight, would have cut
three inches off the ends of the other pieces of lumber so that we
wouldn't have to fill in the gaps where the bin is a little bigger than
the plywood.) Then we screwed the 2X12s together into an eight
foot by four foot box and topped it off with a sheet of plywood.
We cut one of the 2X12s and
one
of the 2X3s in half (and if we'd been thinking straight, would have cut
three inches off the ends of the other pieces of lumber so that we
wouldn't have to fill in the gaps where the bin is a little bigger than
the plywood.) Then we screwed the 2X12s together into an eight
foot by four foot box and topped it off with a sheet of plywood.
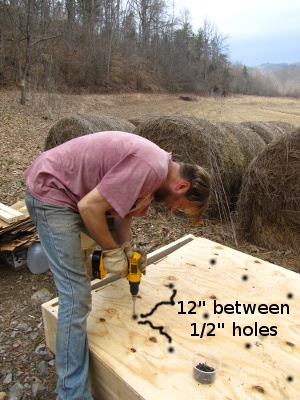
This sheet of plywood
will be the bottom of the worm chamber, so we
drilled half inch holes every foot along the length and width for
drainage and to give the worms a bit of bottom aeration. Mark
also drilled a slightly larger hole in the corner which would become
the downhill end when the bin is turned over so that water wouldn't
pool there.
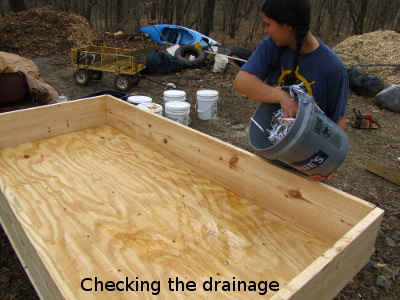
Next, we made another
box out of the 2X3s and set it on top of the
plywood, then added a second sheet of plywood on top of this box.
The result is a tray under the bin to collect
the compost tea.
A hole in the downhill corner allows compost
tea to drip into a bucket.
 After
flipping the bin over, we set it up on
cinderblocks. 4X4 legs would have been cheaper if we were buying
them new, but we always have a lot of seconds cinderblocks lying
around, so it was easy to stack four blocks on each corner. We
were working on a bit of a hill, so we didn't have to add any extra
blocks to make one end of the bin higher than the other. The
purpose of raising the bin off the ground is twofold --- to allow us to
catch the compost tea and to allow for aeration under the bin to keep
the bin aerobic. The downside is that we can't use the earth's
temperature to mitigate summer's heat and winter's cold, but with a
large bin, worms should be able to keep working all year round anyway.
After
flipping the bin over, we set it up on
cinderblocks. 4X4 legs would have been cheaper if we were buying
them new, but we always have a lot of seconds cinderblocks lying
around, so it was easy to stack four blocks on each corner. We
were working on a bit of a hill, so we didn't have to add any extra
blocks to make one end of the bin higher than the other. The
purpose of raising the bin off the ground is twofold --- to allow us to
catch the compost tea and to allow for aeration under the bin to keep
the bin aerobic. The downside is that we can't use the earth's
temperature to mitigate summer's heat and winter's cold, but with a
large bin, worms should be able to keep working all year round anyway.
The last step is to add
a lid on top. A piece of plywood should
be enough to keep animals and rain out while keeping the bin moist and
dark. No pictures of this step yet since we ran out of time on
Friday and didn't install the hinges yet.
 Total cost for the worm bin,
using nearly completely new materials, is just under $100. We
figure we'll probably expand into a second bin this summer, and are
already thinking of ways to make the second bin better. Would a
bead of liquid nails along the edges of the bottom keep moisture from
settling into the joints and rotting out the wood as fast? (We
can't use treated wood since treated wood is reputed to kill
worms.) Could we make a cheaper bin by using multiple 2X6s or
2X4s for the walls, or maybe even plywood? I'm sure that worm bin
2.0 will be even better, but this one was easy to make and should work
fine for now.
Total cost for the worm bin,
using nearly completely new materials, is just under $100. We
figure we'll probably expand into a second bin this summer, and are
already thinking of ways to make the second bin better. Would a
bead of liquid nails along the edges of the bottom keep moisture from
settling into the joints and rotting out the wood as fast? (We
can't use treated wood since treated wood is reputed to kill
worms.) Could we make a cheaper bin by using multiple 2X6s or
2X4s for the walls, or maybe even plywood? I'm sure that worm bin
2.0 will be even better, but this one was easy to make and should work
fine for now.
| This post is part of our Hands-on Wormkeeping lunchtime series.
Read all of the entries: |

Or explore more posts by date or by subject.
About us: Anna Hess and Mark Hamilton spent over a decade living self-sufficiently in the mountains of Virginia before moving north to start over from scratch in the foothills of Ohio. They've experimented with permaculture, no-till gardening, trailersteading, home-based microbusinesses and much more, writing about their adventures in both blogs and books.
Want to be notified when new comments are posted on this page? Click on the RSS button after you add a comment to subscribe to the comment feed, or simply check the box beside "email replies to me" while writing your comment.
Why not paint the inside of the worm bin with a polyurethane boat lacquer? That would make it watertight and prevent rot. Polyurethane is sold as both a single or two component variety. The single component stuff cures with moisture from the air. The two component variety cures when both components are mixed. This is often used on wooden boats, because it resists moisture and light well once it's cured. It will not leach components.
Alternatively, try finding an old polyester/fiberglass bathtub for your next bin. It will be watertight and comes with a ready-made drain hole in the bottom. They might even come with insulation already applied. The gelcoat that is used on the inside is harmless to human cells (we've had several kinds tested for biocompatibility at work; they were all OK) and so presumably to worms as well.
Roland --- I should have known you'd have a non-toxic sealing option idea! Sounds like boat lacquer is a good idea.
Roland and Vester --- I really like the bathtub idea too, but haven't been able to come up with any free ones yet. We'd probably need about four or five of them to match the area of our current bin. Our county dump has stopped letting people take away trash (!!!), which makes things difficult.
Adam --- I'm relatively sure pressure-treated lumber would kill worms, which is why we used untreated wood. I'd be leery of using it even for the frame since I'd think some of the chemicals could leech inside the bin.
I understand your concern about untreated wood breaking down, but since you can build a bin out of untreated wood for less than $100, there seems to be little point to overbuild it. Even if you built a new one every three years for the next sixty, you'd have only spent $2,000! I suspect a bin would last considerably longer than three years too --- the one shown here has been in service for a year and a half with no signs of decay yet.
We have changed our design slightly, though, to make it more ergonomic. Still playing with the lid --- we liked this design even better.
I'll be curious to see what you come up with!
Adam, the cinderblock idea sounds nice. Only downside is you can't collect the liquid from the bin. I never do this anyways though really, so this might be a great way to go.
I believe plywood is usually adhered with glues, I'm guessing toxic to humans if ingested, and certainly breaks down over time. Same thing with the construction adhesive you mentioned. I think it would be best if you could build the entire thing out of untreated lumber of some sort. And construction sites often have lots of short ends left over (less than 4 feet) and if the company is approachable, they'll probably set aside those short ends for you.
I like the idea of metal, it breaks down fairly naturally, good for the soil in small amounts, and sturdy. I wonder if one can buy plans for one of these, so that we would have something to bring to a metalworker in our community and not have to draw it ourselves (which some of us may not be so great at). That would be a nice to have access to in some way.
Loved reading about your worm bin adventures! What is the name of the ebook to start your own business that is mentioned above? I followed the link but there are several books there. Thanks so much