
Cooking on the wood stove
 Although
the primary reason for upgrading to Jotul
wood stove was to
use less firewood, we were also spooked by ten days without
power at this time last year and wanted to be prepared for future
outages. So when I was shopping for small
wood stoves, one of
the features I looked for was a stove that concentrated its heat in a
burner on the stove surface.
Although
the primary reason for upgrading to Jotul
wood stove was to
use less firewood, we were also spooked by ten days without
power at this time last year and wanted to be prepared for future
outages. So when I was shopping for small
wood stoves, one of
the features I looked for was a stove that concentrated its heat in a
burner on the stove surface.
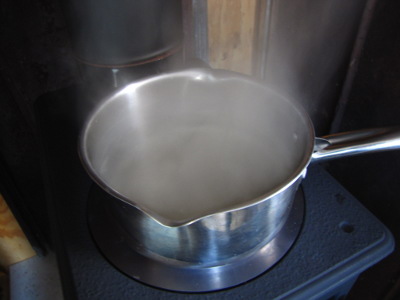
Of course, having a
backup cooking surface does no good if you don't know how to use it, so
I've been experimenting to see what's easy and tough to cook on the
wood stove. Boiling water for tea or to do dishes is easy,
especially in the early morning or late evening when I burn a hot fire
to heat up the trailer fast. Beans, stock, and soups do very well
on the wood stove too, simmering on the late morning and early
afternoon heat when I often let the stove slowly burn its way
out. I've found that I cook a lot more beans and soup lately
since I've got the wood stove right there putting off heat.
With the low-hanging
fruit figured out, next I plan to try slightly more complicated
cooking. Dutch ovens are made for this application and I'm
looking forward to giving mine a shot on top of the wood stove, while
Mark has dreams of building me a little stovetop oven to cook muffins
in. I'm not sure if the surface gets hot enough for sauteing, but
I'll give that a shot too. For those of you who cook on a wood
stove but not a wood cook stove, do you have any tips?

Or explore more posts by date or by subject.
About us: Anna Hess and Mark Hamilton spent over a decade living self-sufficiently in the mountains of Virginia before moving north to start over from scratch in the foothills of Ohio. They've experimented with permaculture, no-till gardening, trailersteading, home-based microbusinesses and much more, writing about their adventures in both blogs and books.
Want to be notified when new comments are posted on this page? Click on the RSS button after you add a comment to subscribe to the comment feed, or simply check the box beside "email replies to me" while writing your comment.
Before you start building, keep a couple of things in mind. The most basic design would be to build a insulating box that sits on top of the stove.
Cooking ranges seem to direct the hot flue gases around five out of six surfaces of the oven compartiments, giving much better heat transfer.
I'm assuming you've looked at wood-fired ranges and rejected them as being to expensive and/or to high-powered?
So you'd want to improve heat conduction from the stove to the "oven".
Therefor I would suggest starting with a cross-shaped thick piece of aluminum plate (conducts heat well). Fold or hammer the outsides 90 degrees until you get a box with an open top. Put this on the top of the stove, possibly removing the cooking plate for better heat transfer. Now build another open-topped box from from a heat-resistant insulating material (e.g. perlite bonded with as little cement as possible) that fits over the aluminium box. Put whatever you want to bake inside the aluminium box. Slide the insulation box over it and light up the stove. This design should give you heating on five out of six oven surfaces. You might want to stick an oven thermometer probe through the top of the insulating box so you can check the temperature.
I considered a cook wood stove when we were shopping for wood stoves, but decided to go with an efficient heating stove instead. No one seems to have designed an efficient cook stove beyond the rocket stove, and heat is our main concern. Homesteaders often opt to just get a good cook stove and a good heating stove and run one or the other depending on what they're trying to do at the time, but we just don't have the space for double!
Very good point about the maximum temperature. It gets really hot on top of the stove, but I don't know how hot --- sounds like I should invest in an oven thermometer.
I like your design! Mark's in the thinking stage on this project, and I suspect your ideas will be very helpful.
It doesn't surprise me that a standard range is not an efficient heater; they have different (and contradicting) purposes.
Based on the size of a range and the size of the pieces of wood you can burn in them, it probably has significantly more power than your Jotul.
There are however ranges that have built-in water heaters. These can heat tapwater and feed radiators for heating your whole house comfortably. You can even control where the heat goes.
We had a wood stove - not cookstove, in our kitchen as it did not have heat and as a heatsource for the house. I often cooked on the wood stove, mainly like yourself, soups and stews. I am pretty sure I could have fried/sauteed something when the fire was hot. Keeping the lids on the pots/pans would keep heat in.
I have read a few good recipes and stories with recipes for cooking on a wood stove, especially cast iron cooking. You may want to google that. I can't remember the site but there was also baking cornbread in the lids mentioned.
Roland --- I almost got the Two Dog Stove because it has a water heater reservoir on the side. On the other hand, it's pretty simple to just heat water up in a pot on top, and I'm completely glad we got the efficient stove instead. I don't think we'd want to heat the house with pipes of hot water --- that sounds like a system that would really have to be kept above freezing at all times.
Alison --- Good idea about cast iron! I'll bet there's even a book about cooking on wood stoves. I'll have to do some library searching....
A radiator heating system only needs to be kept above freezing if you use pure water. Of course you could fill the the system with a mix of 50% water and 50% ethylene glycol. (this is the same mix that is used in car cooling systems) That would keep it from freezing until -37 °C (-35 °F). That cold enough for you?
But keeping my house about freezing (by about 20 °C ) is the whole point of having a heating system!
I will agree that a point heat source like a stove is very comfortable near the stove because of the high temperature IR radiation it puts out. But since I switched from a stove-with-ratiators setup to a system where the radiators are fed by a high efficiency boiler, my whole house has been noticably more comfortable.
After tinkering with recipes, I have come up with this as my own corn bread favorite.
Equipment: 10-12 inch iron skillet, sprayed with PAM (or oiled or buttered). Large pot top to cover the skillet (preferably flat, or domed, but not concave); large mixing bowl; 2 cup glass measuring cup; 1 teaspoon measuring spoon; wire cooking rack that fits the top of the wood stove; large mixing spoon and rubber spatula, to scrape the batter from the bowl.
In a large bowl, mix well: 1 cup fine corn meal 1 cup soy flour (it adds lots of protein and a good texture. If you don't want to use soy, use 1 cup wheat flour) 3 teaspoons of double acting baking POWDER (not baking soda) 1/4 teaspoon salt (optional) Stir very well until salt and baking powder are totally mixed in.
In a two cup glass measuring cup, mix: 2 large eggs 1/3 cup canola oil 1/3 cup dark maple syrup (or part of the corn juice from the canned, cooked corn that you will add, below). Stir well until eggs, oil and syrup or corn juice are well blended. Add milk or soy milk or almond milk to bring to a full 2 cups of liquid, and stir well.
At this time, put the PAM sprayed or buttered skillet directly on the wood stove. Then, go back to the kitchen and add the 2 cups of wet ingredients into to the well-stirred dry ingredients and quickly add in 1 cup of cut, cooked corn kernels and stir with a large spoon only until mixed (don't over mix). Bring the mixed batter to the stove and pour it into the hot skillet. (Note: I use organic canned corn (unsalted) in the winter, or freshly cooked corn in season). Cover the skillet, preferably with a flat cover (to completely seal the top, including the pour spout on the skillet if it has one.) A minute or two later, lift the lid. If there are bubbles beginning to come to the top, then carefully lift the skillet with a heavy pot holder and place a wire cooling rack on top of the woodstove, and then put the corn bread back on the rack. (Note: Leaving the skillet too long directly on the stove will create a burned, black bottom to the cornbread, rather than the slightly browned bottom side that you will enjoy.) Depending on your stove, the corn bread will take less than an hour to more than an hour to cook. In about 40 minutes, lift the pan top and check the middle of the bread. Once you can tap the middle of the cornbread with a fork and have it feel firm, put a fork into the middle, and pull it out. If it comes out without liquid batter on it, it is done. Remove it from the wood stove and put it on a cooling rack (still covered) for about ten minutes. Then, cut and enjoy!
I would like to share that I've been cooking on the Amish built Flame view wood cook stove since 2009 - and we use it to heat our 2,000 sq.foot home as well as to cook and bake in. We did not purchase the fan with it and don't need to. It heats our home at a toasty 78 degrees in our 1,000 sq foot area around it. Our rooms are a little cooler - to sleep in. WE have absolutely loved our stove. It's easy to bring up to temp to cook and bake in - it is very efficient and easy to clean. It's the best purchase we've ever made and wish we had done it sooner. We haven't used our furnace for the past 6 years at all and we live in southern Indiana. We have cold winters. I wanted a stove that I could both heat and cook with. The Flameview wood cook stove does that. The large 20 gallon water reservoir - we use to wash our many dishes. We love the security it has given us. We make toast in it by putting our pan of bread on the top shelf inside the oven. Doesn't take long for toast.